Posted by Brian D. on 19th Nov 2019
Thanksgiving Part 1 of 2
So Thanksgiving is right around the corner, and as we all know Thanksgiving is the one day we’re supposed to focus on what we have, and not what we want but don’t have, as we do usually.
Not that it always works like this, but still, I like the meaning. We’ll never stop wanting more, but if we don’t learn to be grateful for what we have, we’ll never be satisfied in our life. One thing that we can be grateful for on Thanksgiving, and always is family. So today we are going to focus on some DIY crafts that you can do with your kids or grandkids to get ready for the holiday. Feel free to share your own DIY ideas in the comments below.
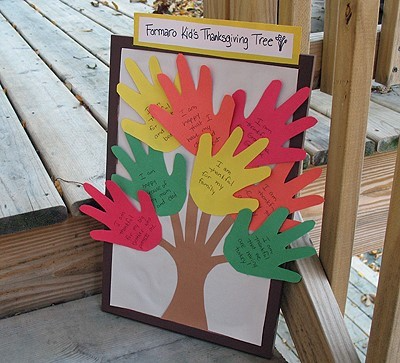
A Child’s Thanksgiving Tree Tree template
Author: Amanda Formaro
Supplies
- Construction paper: red orange, yellow, green, brown
- Cork bulletin board or poster board
- Pen
- Tree template
- Glue stick or thumbtacks
- Paint for border of bulletin board optional
- White paper to cover cork optional
Instructions
- This first step is optional. I painted the border of my bulletin board with brown paint and covered the cork with white paper because the cork was pretty well used. Again, completely optional.
- Trace children's hands on sheets of red, orange, green and yellow construction paper. Have kids right what they are thankful for on one side, and write their names and the year on the back side.
- Cut the tree from brown paper using the template. If you covered your cork with paper or if you used poster board, use a glue stick to attach the tree. If you are using a plain cork board, use thumbtacks to attach the tree.
- Use glue stick or thumbtacks to attach the hands to the tree.
- Use a piece of yellow construction paper as a border and a smaller piece of white paper glued on top of it, then write your family surname and "Kid's Thanksgiving Tree" (i.e. Formaro Kid's Thanksgiving Tree) with a black marker (see picture). Attach to the top of the bulletin board with glue stick.
- Display for everyone to see!
Edible Turkeys
Thanks to amy-fun4kids.blogspot.com/2008/11/thanksgivingturkey.html
Read a book together and then make a yummy turkey snack, using an Kauffman apple for the body,
8 toothpicks (1 for the neck and 4 for the feathers, and 3 for the base so the apple is balanced),
1 Large Marshmallow for the head,
1 candy corn for the beak
2 small candies or chocolate chips, or raisins for the eyes.
You'll also need some finger food for the feathers. Here are some ideas: grapes, cheese cubes, banana slices, cheerios, fruit loops, raisins, mini Marshmallows or any other finger food that can be stacked or pierced through a toothpick easily. You can also use gumdrops if you want a candy version.
Set out the finger food items in small bowls or on a plate, ready to go, before hand. It is safer to have the toothpicks already poked into the apple, ready to decorate, before calling your child over to the table. ***Make sure that you are extremely attentive during this activity so that no one gets hurt with the toothpicks. When putting the eyes and beak on, it helps to pinch out and remove a little piece of the large marshmallow, so the candy can be pushed into the marshmallow and stay in place.
Have fun, be safe, and remember....be Thankful

